I am so over being sick and having sick kids, but it seems that the germs have other ideas in mind. This week we have started round 3 with strep throat. The littlest one and I both have it again. We'll see how long it is before the others come down with it. I am doing my best to keep the germs at bay, but with 3 kids, it's hard to really keep them separated. Although, they fight so much that you would think they would want to be separated. Oh No, they are all in each others space. It's crazy.
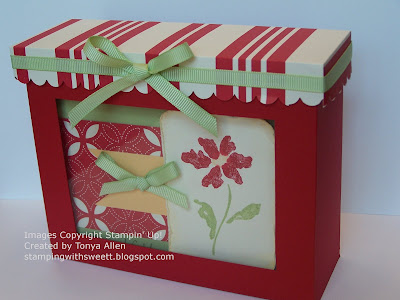
And then things get put into perspective...A friend called me this week and asked if I would be interested in donating some cards to a silent auction being held for one of her family memebers. He has cancer and the auction is to raise money for his care. Of course, I am honored to be asked and I can only hope that my little donation will raise some money. So this morning I sat down to create and I'd like to share what I made. (That is the whole reason for this blog right? lol) I ended up making a set of four cards with envelopes and a cute little box to hold them all. I used some retired Stampin' Up! Double sided paper for these projects because I was basing the cards on some I made a few months ago. And also because I just love that paper. I don't think I have met a DSP that I didn't like...
So, here it is:
With the top off:
And here are the cards:
sorry about the blurry picture. I don't have another shot of this one. :(
And here's a shot of the envelopes that I lined to match:
I made the card box with a window in the front so that people at the auction could maybe see what's inside. Or they may take the cards out of the box to display at the auction, I don't know. But either way I really like the window on the front. I haven't done a tutorial before, but I may try to do one for this little box. Let me know if you would be interested in that.
Stuff I used: All Stampin' Up! Stamps: Heartfelt Thanks Paper: Retired DSP Cerise, Certainly Celery, Apricot Appeal, Real Red, Very Vanilla Ink: Markers in Celery, Apricot, Red, Old Olive and Celery, Apricot, Red and Always Artichoke pads Other: Ribbons in Celery, Vanilla and Red, Distressing tool, Tool kit (paper piercing), Retired Hodgepodge Hardware, Vintage Brads, pop dots, glue dots, transparency, Corner Rounder Punch, Sponges
As always, thanks for dropping by. I'd love to hear your comments. And Have a Stamptacular Day!
Thursday, April 30, 2009
Saturday, April 25, 2009
Viva-las-VSN!!
If you were around for the last Mini VSN challenge that I participated in, then you know that our theme is Viva-las-VSN and all challenges are inspired by things in Vegas (BABY! I'm not sure why I feel compelled to yell out BABY!! every time I say the word Vegas (BABY! - see, there I go again!) but I do. Besides it's fun! Try it!) If you missed the last go around, then click HERE to check it out!
Alright, I finished the first 3 challenges from this morning's MINI VSN. They were lots of fun. I found out a little later that there was a 4th challenge posted at 1pm, but I had to scoot off and cook for a youth group party tonight. I'll do that one later if I get a chance.
Take a lookie at what I have done so far. And as always, I would love to hear what you think!
Challenge Number 1: Inspired by the game of Black Jack. Each element of a card was assigned a points value and we had to choose our elements, add up the points values and try to hit 21! See how clever these ladies are??!! This challenge was harder than it first sounded because I kept going over 21 and going Bust. Finally, I came up with this little card and I am quite happy with it. This is how the points were figured:
So my Points were: Layers 6+ Ribbon 2+ DSP 3+ Stamps 10 = 21!! Black Jack!!
I used Stamps: Trendy Trees Paper: Good Morning Sunshine, Pacific Point, Kiwi Kiss, Whisper White Ink:Pacific Point, Kiwi Kiss, So Saffron, Chocolate Chip Other: Sponge, Scallop Edge punch, So Saffron Striped Grosgrain Ribbon
I cut a piece of Kiwi Kiss paper in a hill type shape to go under the trees and sponged on Kiwi Kiss ink to give the paper a stippled look, more like grass.
Challenge Number 2: Inspired by Gold! Gold! Gold! We were to use gold on our cards. Could be gold paper, gold embossing, gold hardware, whatever... The only thing I had on hand that was gold was embossing powder, so I went with it! I made this little Rock Star card for a friend's daughter who is turning 14 soon. The "Rock Star" star was embossed on black cardstock with gold powder and punched out. I backed it with another piece of black cardstock. The other gold stars were made by embossing a piece of black cardstock all over with the gold powder. Then I just punched them out.
Stamps: A Little Somethin' Hostess Set Paper: DSP Hostess Pack, Tempting Turquoise, Pink Passion, Basic Black Ink: Versamark Other: Star punches, White gel pen, Gold Glory embossing powder, Turquoise Ribbon, Scallop Edge punch, popdots
Challenge Number 3: Inspiration was the Cirque de Soile featuring songs by the Beatles. We were to choose a song as our inspiration. I love the Beatles and all of the songs were good ones. I had a hard time deciding. So, I went with a combination of 2, Strawberry Fields and Lucy in the Sky with Diamonds. For this card I made a faux quilt using DSP and the Top Note die. This was the first time I have tried a quilt and it was a lot of work, but so much fun. Now that I know how to do them, it won't take as long. I also ran the quilt through the Big Shot using the diamond texture plate. So the colors were inspired by the Strawberries and the diamonds were from Lucy!
Stamps: Oval All Paper: Riding Hood Red, Kiwi Kiss, Bella Rose DSP, Chocolate Chip, Whisper White Ink: Riding Hood Red, Chocolate Chip Other: White Satin Ribbon, Scallop Oval punch, Wide Oval punch, Small Oval punch, Big Shot, Top Note Die, Diamond Texture Plate, Zyron, popdots.
I cut a piece of white cardstock 4 1/2 x 5 1/2 for the base of my quilt. I ran it through the Zyron with the adhesive cartridge. I cut the DSP out in 1 inch squares and arranged them on a scrap piece of paper. When I was happy with my pattern, I transferred each square to the white cardstock. If you don't have a Zyron, just cover your base cardstock with adhesive of your choice. I would recommend using SU's Anywhere Glue Stick. After all of the squares were applied, I ran the whole thing through the Big Shot with the texture plate to add a quilted effect to the cardstock. It is impossible to see in this picture, but in real life it looks very cool. Next, I ran the cardstock through the Big Shot again, this time using the Top Note die to cut out the quilt. I can't wait to try this again. The hardest part was deciding how I wanted the squares laid out. Other than that, it was pretty easy and lots of fun.
So I have just about worn myself out with this post! But now I have to go finish cooking the desserts for my son's youth group party. I hope I'll be able to participate in the rest of the challenges, and if I do, I'll be back to post the rest of my creations. Thanks for stopping by!!
Alright, I finished the first 3 challenges from this morning's MINI VSN. They were lots of fun. I found out a little later that there was a 4th challenge posted at 1pm, but I had to scoot off and cook for a youth group party tonight. I'll do that one later if I get a chance.
Take a lookie at what I have done so far. And as always, I would love to hear what you think!
Challenge Number 1: Inspired by the game of Black Jack. Each element of a card was assigned a points value and we had to choose our elements, add up the points values and try to hit 21! See how clever these ladies are??!! This challenge was harder than it first sounded because I kept going over 21 and going Bust. Finally, I came up with this little card and I am quite happy with it. This is how the points were figured:
- Each Layer - 1 point
- Each Ribbon - 2 points
- Each Stamp - 5 points (Very hard because Each Different Image was 5 points!)
- Each piece of Hardware - 1 point
- Each Pattern of Patterned Paper - 3 points
So my Points were: Layers 6+ Ribbon 2+ DSP 3+ Stamps 10 = 21!! Black Jack!!
I used Stamps: Trendy Trees Paper: Good Morning Sunshine, Pacific Point, Kiwi Kiss, Whisper White Ink:Pacific Point, Kiwi Kiss, So Saffron, Chocolate Chip Other: Sponge, Scallop Edge punch, So Saffron Striped Grosgrain Ribbon
I cut a piece of Kiwi Kiss paper in a hill type shape to go under the trees and sponged on Kiwi Kiss ink to give the paper a stippled look, more like grass.
Challenge Number 2: Inspired by Gold! Gold! Gold! We were to use gold on our cards. Could be gold paper, gold embossing, gold hardware, whatever... The only thing I had on hand that was gold was embossing powder, so I went with it! I made this little Rock Star card for a friend's daughter who is turning 14 soon. The "Rock Star" star was embossed on black cardstock with gold powder and punched out. I backed it with another piece of black cardstock. The other gold stars were made by embossing a piece of black cardstock all over with the gold powder. Then I just punched them out.
Stamps: A Little Somethin' Hostess Set Paper: DSP Hostess Pack, Tempting Turquoise, Pink Passion, Basic Black Ink: Versamark Other: Star punches, White gel pen, Gold Glory embossing powder, Turquoise Ribbon, Scallop Edge punch, popdots
Challenge Number 3: Inspiration was the Cirque de Soile featuring songs by the Beatles. We were to choose a song as our inspiration. I love the Beatles and all of the songs were good ones. I had a hard time deciding. So, I went with a combination of 2, Strawberry Fields and Lucy in the Sky with Diamonds. For this card I made a faux quilt using DSP and the Top Note die. This was the first time I have tried a quilt and it was a lot of work, but so much fun. Now that I know how to do them, it won't take as long. I also ran the quilt through the Big Shot using the diamond texture plate. So the colors were inspired by the Strawberries and the diamonds were from Lucy!
Stamps: Oval All Paper: Riding Hood Red, Kiwi Kiss, Bella Rose DSP, Chocolate Chip, Whisper White Ink: Riding Hood Red, Chocolate Chip Other: White Satin Ribbon, Scallop Oval punch, Wide Oval punch, Small Oval punch, Big Shot, Top Note Die, Diamond Texture Plate, Zyron, popdots.
I cut a piece of white cardstock 4 1/2 x 5 1/2 for the base of my quilt. I ran it through the Zyron with the adhesive cartridge. I cut the DSP out in 1 inch squares and arranged them on a scrap piece of paper. When I was happy with my pattern, I transferred each square to the white cardstock. If you don't have a Zyron, just cover your base cardstock with adhesive of your choice. I would recommend using SU's Anywhere Glue Stick. After all of the squares were applied, I ran the whole thing through the Big Shot with the texture plate to add a quilted effect to the cardstock. It is impossible to see in this picture, but in real life it looks very cool. Next, I ran the cardstock through the Big Shot again, this time using the Top Note die to cut out the quilt. I can't wait to try this again. The hardest part was deciding how I wanted the squares laid out. Other than that, it was pretty easy and lots of fun.
So I have just about worn myself out with this post! But now I have to go finish cooking the desserts for my son's youth group party. I hope I'll be able to participate in the rest of the challenges, and if I do, I'll be back to post the rest of my creations. Thanks for stopping by!!
Happy Saturday!
The sun is shining, the birds are chirping... the mosquitos are biting... ick! Yes, it's a beautiful day, but the mosquitos and gnats are already out in full force. My solution? Stay inside and Stamp, baby!!
Today is another Virtual Stamp Night over on SCS. Yes, I know it is day time right now and the title says Stamp "night", but it goes on from 10-1 and 7-10, so part of it will be during the night. Today is actually a warm up for the real VSN in May. And that one is the biggie. There will be challenges Friday night and into Saturday. It's also mega fun! Anyway, today is a mini version and is a fun challenge that has 6 parts. Each hour (10,11,12, &7,8,9) our hostesses put up a challenge. We, the challengers, have 45 minutes to plan and create a card that follows the guidelines of that challenge. So, I am going to try to play in all 6 challenges today. I'll take a little time during the break and try to post my 3 creations from the morning. The 3 from later tonight will probably not make it on here until tomorrow, but we'll see.
Check back later today and let me know what you think of my creations. Thanks and Have a Stamptacular Day!!
Tuesday, April 21, 2009
Tuesday! Tuesday! Tuesday!
Ok, so I know it's supposed to be Sunday! Sunday! Sunday!, but it's only Tuesday today. And I just felt like using my monster truck rally announcer voice. Tell me you didn't do the same when you read it... come on now, you can be honest. Umhm, that's what I thought.
One of the challenges on Tuesdays (on SCS) is the Color Combo Challenge. Today's combo was Pink (Pretty in Pink or Pink Pirouette), Basic Grey and Rose Red. I love grey and red together. Probably because I love red and black. But you see, I am not a pink kind of girl. I tried to use it. Really, I did. But I just couldn't make it work in the end. So my card only has Grey and Rose Red. Well, and white of course. The layout I used was from MojoMonday Week 75 (February 23, 2009). I have had my eye on that layout since it was released and I am so in love with it. I think it is all those brads (or buttons, dots, stickies, whatever) lined up that do it for me. But I haven't actually used the layout until today.
Take a look see:
Isn't it just Stinkin' Cute?? I thought so. lol
Here's a close up of the cutie skunk:
This shows you how much dimension there is on the card front.
And here's the inside of the card. You have started decorating the inside of your cards now haven't you?? I just did a simple border and a Sentiment. Easy Peasy, Lemon Squeezy
Here's the deets: All SU: Paper:The double sided paper I used is from the Hostess Pack (that you can earn for FREE just by hosting a SU workshop with me!), Basic Grey, Whisper White, Rose Red. Ink: VersaMark, Rose Red, Going Grey, Bashful Blue. Other: Black embossing powder, Aqua Pens, Tool kit, Scallop Edge Punch, popdots, glue dots, Pretties Kit (flowers and pearl), Vintage Brads.
I stamped the skunk in versamark and then embossed it in black. I used the Aqua pen to watercolor him in using grey for the skunk, rose red for the flower and bashful blue for the shadow. The embossing helps contain the watercolor and won't smear like it would if you used just a Basic Black ink pad. Another option would be to use Black Stazon ink, as it won't bleed or smear either. The skunk and red frame are popped up, and the grey layer with the brads is also popped up. I used a pop dot on the back of the large flower and glue dots to hold on the small flower and half pearl.
So that's it for today. Hope you like the card and I would love to hear what you think! Have a Stamptacular Day!
Monday, April 20, 2009
Just a Quicky!
Super quick post today. But hopefully I'll be back later to add some more. We are super crazy around here!! I haven't been able to participate in Mojo Monday for about 3 weeks now and boy have I missed it. Today I took the time to put a little something together. Now... please ignore the smudges on the circle of white. Long story, and I'll explain later, but I just didn't have time to change it out and take new pics before I am off to carpool, soccer, scouts, etc, etc...
Anyway, here's my entry for Today's Mojo Monday Sketch!
All SU! And I'll add details later, but I used Trendy Trees Stamp set and Washington Apple DSP. Hope you like it!! (told you I was going to be quick!!and if you read it like I feel like I posted it, you'd now be doing this --> ) Have a Stamptacular Day!!
OK, life has slowed down long enough for me to finally add some deets for you. Of course, life will speed back up soon because carpool starts up in about half an hour. Wait, can one call it carpool if one is only toting around one's own children? And does one ever feel strange having to refer to one's self as one? Yes, one can and yes, one does. At least if you ask me. But I digress...
Ingredients: All SU: Paper:Bashful Blue, Robin Hood Red, Whisper White, Pumpkin Pie Cardstock and Washington Apple DSP; Ink:Robin Hood Red, So Saffron, Bashful Blue, Close to Cocoa; Other:Scallop Circle punch, Scallop Edge punch, 1 1/4 circle punch, Clear Rhinestone Circle Brad, flower from Pretties Kit, Pumpkin Striped Grosgrain Ribbon, popdots, White Gel Pen.
A couple of notes: All of the flowers in the pretties kit come in white, but can easily be colored using one of several methods. For this flower, I wanted a fairly intense color so I put the flower onto my Robin Hood Red ink pad and used a sponge to press it into the ink until it was covered. I did both sides. It takes a LONG time to dry on it's own. So I used my heat tool and tried to help the drying along. Obviously I didn't get it all the way dry, and that's why there are smudges all over the little circle behind it. And I will tear that all apart and make a new one. I just was running so late yesterday and I really wanted to go ahead and post, so I left it smudges and all. The middle tree was stamped twice, once on the main image and once on scrap paper. I cut out the scrap one and popped it up. The circle/flower detail is also popped up.
Well, that's it. Thanks for stopping by!
Tuesday, April 14, 2009
Whew....
Warning!! I'm a bit wordy today!! :) Boy, Spring Break really wore me out. And now I'm home facing a huge pile of laundry and an empty fridge. I must go to the grocery store! Actually, I should have already gone, but I have been playing around with my goodies today. I got the box in right before I left town and so I really didn't get much time to play. My mojo seems to be a little off today. (Payback for not doing the laundry and shopping, maybe??)
I managed to finish one card today. I started out this morning thinking that I would like to do the last two Mojo Mondays sketches since I had missed both. The card that I finished uses the sketch from last week. Let me tell you it was a challenge! Now, I am sure you are talking to the screen and asking me where this card is already. I know this, because it is what I would be doing. But here is my dilemma, I am trying to decide if I am going to enter into a contest that Stampin' Up! has for their demonstrators. The contest is called the Artisan Award and they choose just 10 people out of thousands of entries to become Artisans of the Year. Demos who enter must send in 3 cards, 2 scrapbook pages, and 1 3D item. They have lots of rules and it is all very interesting, but one of the rules states that the projects sent in can not have previously been posted to a web site or sent in to a magazine, etc for other contests. If I want to send in something that I have made, I can not have posted it here or uploaded it to Splitcoaststampers. So, here I am thinking that I really want to post some of the things I have made (because I am excited with how they turned out) but I am hesitating because I don't know if I am going to enter the contest or not. AGHHHHH! It's so hard to decide. I really really really want to share with you, but I think I also want to enter the contest. See my dilemma?? I am hesitant to enter because I know for a fact that Jan Tink, whom I follow online faithfully and in awe, is entering this year. And I know she should be one of the ones chosen! Don't get me wrong, I am proud of the things I create, but when I think about all of the amazing talent out there, I get a bit weak kneed. I just can't decide. I have to decide soon because the deadline is this week. (EEEKKKKK!!) I'll let you know what I decide....
In the mean time, so you won't hate me (I hope), I will post a couple of projects I did a bit ago. I made these cards with some retired SU double sided papers because at the time I was still waiting on my new kit to arrive. I saw some cards in the gallery on SCS that I instantly adored. I went to the creator's blog and have really enjoyed looking at her stuff. She does a weekend sketch challenge almost every week where she picks 4 sketches and makes a set of coordinating cards using those sketches. I saw one set that she did using the A Little Birdie Told Me set and had to try my hand at it. You can see her blog and creations HERE. Remember that when I made these, I did not have my new stuff in and most of what I owned was retired. I was trying my best not to use any retired items and make do with limited supplies. However, I needed some DSP so I had to use what I had, even though it is retired. I think they turned out nicely just the same. I would love to hear how you think I did!!
Here are my cards:
And here is a little box I made to go along with the set.
I hope y'all have a Stamptacular Day! I'm off to carpool and soccer...
Saturday, April 11, 2009
Happy Easter!
So I hope you don't think i have abandoned you! I am still out of town enjoying the last little bit of spring break. We have been so busy and I am getting to the point that I am ready to be back home. Then maybe I can get some rest after this vacation! Of course, I won't get much rest because there will be about a billion loads of laundry to do. I've said it before, and I'll say it again, Laundry Multiplies!!
Anyway, since I am away from home, I can't upload any new projects for you just yet. But I did manage to get a couple of things made after my BBOG* came in on Monday. (*that would be Big Box O' Goodies.) So I will post as soon as I get home.
I hope everyone is having a wonderful Easter weekend! Have a Stamptacular Day!
Tonya
Friday, April 3, 2009
It's Friday!! Woo Hooo!!
I am mostly happy it's Friday. You see, schools were canceled because of flooding, so the kiddos are home today. And I know I shouldn't feel this way, but I am not excited to have them here today. I had so many things on my to do list and they have this knack for getting in the way. So I am not getting much checked off the list. But I am happy that the weekend is almost here! Maybe I'll get some uninterrupted crafting time. OH, OH and also, because on Monday my box of new goodies will be here and I can't wait to play!!
So, today's post will be somewhat short. I'll just share with you a few of items I have been working on over the last couple of weeks.
Here is a shot of some Easter Gift Ideas.
A quick but super cute Easter Card.
Here, again, I have to apologize, because I can not find the original creator of this card. I changed a few things, but the basic idea and layout are not originally mine.
And finally a card using the Faux Stained Glass Technique. This is a super neat technique and if you want to give it a try check out THIS TUTORIAL over on SCS> (yes, again.) You get such a beautiful result. It's another one that you need to see in real life to appreciate fully. Which reminds me, that if you are in my area, be sure to check out my Stampin' Up! website for my Calendar of Events. I will be holding technique classes soon, where you can learn hands on how to do many different techniques.
I will be back later to post all of the details for these projects and to connect the link to the tutorial(SCS is down for a bit)when the kids are in bed and I can actually think!
That little duck has nothing to do with anything. I just saw him and had to have him in my post. lol Isn't he so cute???
Subscribe to:
Posts (Atom)